Entering Invoices Paid by Credit Card - Inventory Transactions
In my previous blog post Entering Invoices Paid by Credit Card - Non-inventory Transactions, I went through the process for entering non-inventory transactions that are paid by credit card. In this post I will provide the process for invoices related to inventory for Dynamics GP.
Case 2: Inventory Purchases
Enter the Enter/Match Transaction as usual.
Enter the Credit Card payment: Purchasing > Transactions > Manual Payments.
Date: Enter the date the payment was or will be made.
Vendor ID: Select the Vendor ID.
Payment Method: Mark Credit Card.
Select the Credit Card.
Document No: By default the Payment number will auto-fill as the Document No. Change this to match the Vendor Invoice Number. Because GP will not allow duplicate Document numbers for the same vendor, add PMT to the end of the document number.
Click the Distribution button: The correct distribution should be a debit and a credit to the Accounts Payable account. The debit will be CASH and the credit type will be PAY.
Click OK.
Click the Apply button: Apply this payment to the invoice entered through Enter/Match.
Click OK.
Click Post.
At this point you have entered the invoice and payment for this vendor (in this example, A Travel Company). If you look at the Transactions by Vendor, you will see both the invoice and payment are entered and applied.
At the same time, this entered a payable for the Credit Card Vendor.
Now, when you do a Select Checks for the credit card company, all the invoice that are due for that payment are available for selection. You should only mark next to the transactions that are included in the current bill.
If you don't pay the credit card by check, you can enter a Manual Payment and apply it to all of the invoices that are included in that bill/payment transaction.
GP 2013 Additional Feature
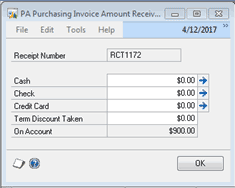
If you are using GP 2013, you now have the capability to enter payment information in the Purchasing Invoice Entry window. In the lower left of the window, there is now an Amount Received field, where you can enter the amount and how the invoice was paid.
By clicking the blue arrow, it will open the PA Purchasing Invoice Amount Received window. Then you can enter the amount paid by Cash, Check, or Credit Card for this invoice.
This is similar to the process for Non-Inventory Transaction entries.


