
How to use Microsoft Flow and Microsoft Planner to better manage leads in Dynamics 365
Using a CRM system to track leads and opportunities is a good way to keep up with the sales funnel. However, it is far too easy to neglect leads and opportunities when you are trying to juggle many other tasks and responsibilities. For an organization like ours that uses Dynamics 365 for Customer Engagement (formerly Dynamics CRM) for sales management and Office 365 for productivity, it makes sense to utilize every tool we can to keep up with sales. That is why I created a flow to automatically create a task in Microsoft Planner when a lead is created in Dynamics 365.
If you haven’t heard of it, Microsoft Flow is a cloud-based workflow tool built into Office 365 that automates business processes to help you work more efficiently. Flow connects with Office 365, Dynamics 365, and many common 3rd party services to share data and make things happen.
Accessing and using Microsoft Flow
Like any other Office 365 application, Microsoft Flow can be accessed from the Office 365 web portal. Once in the application, you have the option to create a flow from scratch or search through the template catalogue curated by Microsoft. I recommend browsing this catalogue to find other helpful workflows that automate tedious tasks or improve productivity in some way.

How does a flow work?
Every flow has two parts: the trigger, and one or more actions. The trigger is the starting action of the flow. This trigger could be as simple as a lead being created in Dynamics 365 or an email arriving in your inbox. Once a trigger happens, the Flow is set in motion causing other actions to take place.
Creating the flow
To create a new flow, click the My flows tab on the top bar and select Create from blank. Notice again you have the option to create a flow from a template if you like. Microsoft has hundreds of flow templates to use or customize if you don’t want to start from scratch.

The first thing Flow will ask is what action will trigger the workflow. The goal for this flow is to have a new Microsoft Planner task created as soon as lead is created in Dynamics 365 so the trigger will be a new lead record being created in Dynamics 365.
Select the Dynamics 365 connector to let Flow know an action in Dynamics 365 will trigger the start of this flow.

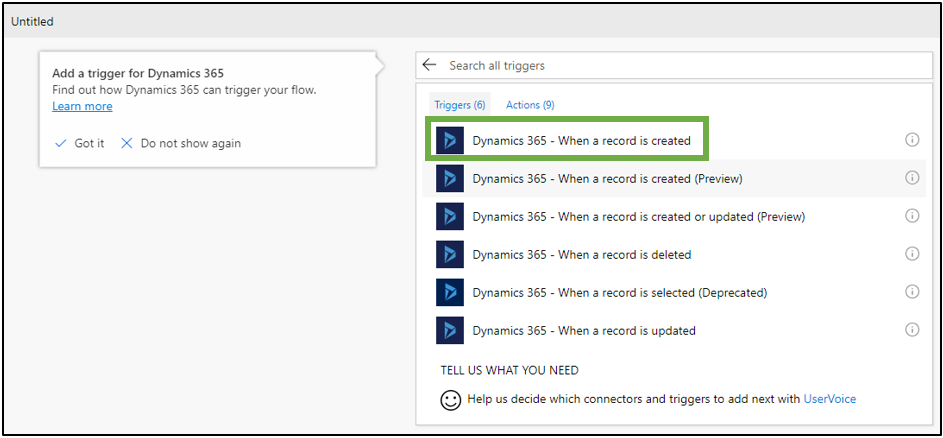
Next, Flow will ask for the specific action that will happen in Dynamics 365 to trigger the start of the workflow. Select Dynamics 365 – When a record is created.
Flow will need to know what Dynamics 365 environment and entity the action is being performed in to create the trigger. Select your organization from the list and the Lead entity from the entity list.

Note: If you have not configured the connection to your Dynamics 365 environment in Flow, you will need to do so before you are able to setup this trigger. To configure the connection, select the gear icon in the upper right corner of the window and choose Connections from the drop-down list. Next, select New connection in the top right corner of the window and select Dynamics 365. You will need to add your credentials for the connection to be successful.
After adding the Flow trigger, add an action to be completed when the workflow is triggered. To add an action, select New step and choose Add an action.

The first action to be completed when a new lead is created in Dynamics 365 is to record the day and time of the lead creation so the task in Microsoft Planner will have due date. In the search bar under actions, type “get future time” and select the Date Time – Get future time action from the list.

Since a new lead is time sensitive, a sales consultant should reach out to the lead within a day of the lead being entered in Dynamics 365 - so set the interval to 1 and the time unit to be Day.

We will use this future time in a later action. Next, add another action to pull the owner of the lead from Dynamics 365. Choose the Dynamics 365 organization from the list, select the Users entity from the entity list, and type in "Owner" in the Item identifier field.

Flow will use this information to assign the planner task to the owner of the lead. However, Flow won’t automatically recognize the Dynamics 365 user as the Office 365 User. To connect the two, an Office 365 action called Get user profile (V2) is needed. This action will connect the Office 365 User Profile Name (UPN) to the Dynamics 365 user by pulling the primary email address of the Dynamics 365 user.

Now that Flow has all the information it needs, add an action to create the task in planner. To do so, select new action and search for Create a planner task.

Now, to move forward we will need to have a plan already created in Planner. If you haven’t used Planner before, you can learn about creating a plan here. Once a Plan in Planner is created, we can move forward with adding dynamic content to the task. First, select a Plan ID and Bucket ID for the task to be added to from each drop down list.
Next, add a title for the task. I titled mine “Reach out to [lead name]” so Flow will pull the name of the lead from Dynamics 365 into the title and make it easy for me to tell what the task is about, without clicking into it. After adding a title, add a start time and due date. The start time should be when the lead is created in Dynamics 365. The due date will be 1 full day from when the lead was created. This is where the future time action that was created earlier comes in. The future time action will read when the lead is created, and automatically set the due date to 1 day in the future in Planner.
Finally, the Planner task needs to be assigned. To do so, add the Office 365 User Principal Name dynamic field that was used in action directly above.

Now all that’s left to do is save and test the flow. Make sure before testing that the flow is turned on. To do so, return to My Flows and verify that it is turned on.

Flow lets you customize automated processes far more than this, but it’s an example of how Flow can improve productivity and remove labor costs.