
Using Dynamics GP to Amortize Prepaid Expenses
If you are using spreadsheets to track your prepaid expenses while trying to remember to manually enter multiple journal entries each period, STOP!
There’s an easier way. Dynamics GP has a feature called Revenue/Expense Deferrals that will calculate and automate the deferral entry process.
When you set up deferrals in Dynamics GP, you control which asset (prepaid) and expense accounts to use, the dates on which the deferrals will occur, and the amount of the deferral. These are all customizable as well. For instance, if you have $5.00 left to defer on the last date, but you would rather combine it with the previous date, you can easily change the payment for that date without affecting the others.
Expense deferrals are set up from a vendor invoice. You can choose to do it right away while entering a new invoice or you can set one up retroactively from a vendor invoice that has already been posted.
Check out our webinar on this topic. If you are interested in additional training materials, please let us know at the bottom of this article!
Creating a Deferral from a New Vendor Invoice
After entering the information on a new vendor invoice click Distributions. In the Payables Transaction Entry Distribution window, select the appropriate expense account. While the line is selected click on the Additional drop-down menu and select Deferral.

100-5160-00 Insurance Expense: $12,000
000-2100-00 Accounts Payable: $12,000
The Deferral Entry window will open up. When the deferral is created two types of entries will be posted: the adjustment entry and the deferral entries.
THE ADJUSTMENT ENTRY
The adjustment entry will post a reversal (credit) to the account in the Deferred Cost field. This field will default to the expense account from the Original Cost field. The entry will also post the Amount to Apportion as a debit to the asset (prepaid) account that you select in the Deferral Account field. This one-time entry will post on the date selected in the Start Period field.
000-1410-00 Prepaid Insurance: $12,000
100-5160-00 Insurance Expense: $12,000
THE DEFERRAL ENTRIES
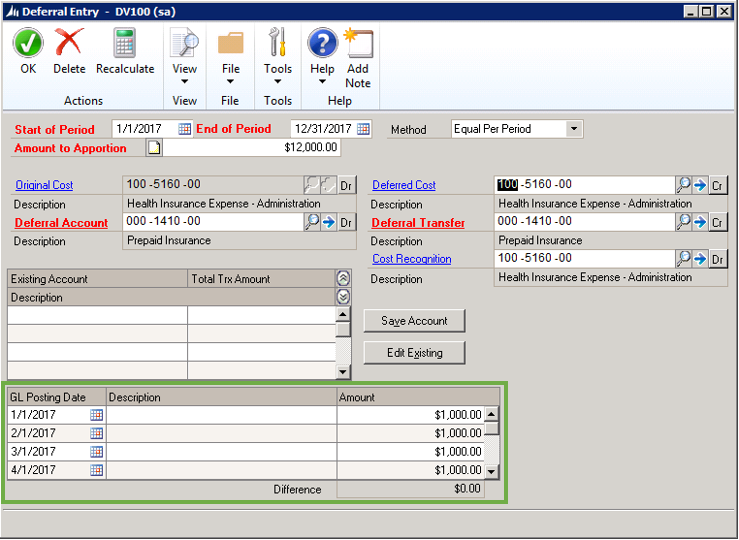
The deferral entries will debit the expense account selected in the Cost Recognition field and credit the asset (prepaid) account selected in the Deferral Transfer field for each date that appears in the GL Posting Date column.
100-5160-00 Insurance Expense: $1,000
000-1410-00 Prepaid Insurance: $1,000
The amount for each deferral entry is calculated based on the date range selected in the Start of Period and End of Period fields, as well as the Method selected. Any of the amounts can be manually adjusted in the schedule pane at the bottom of the window.
Note that the Original Cost field will be set to whichever account has been selected in the original invoice. You cannot change this account. The Deferred Cost and Cost Recognition accounts will autofill to this account as well. Although you will be able to adjust whether these are debited or credited, it is recommended that you do not change the Deferred Cost field, because the adjustment should credit the same expense account that is debited on the invoice.
Likewise, the Deferral Transfer field will autofill to whichever account you select in the Deferral Account field. Although the debits and credits can be changed, and a different account can be selected for the Deferral Transfer account, it is not recommended to do so. The monthly deferrals should be taken out of (credited to) the asset account to which they were posted.

You can create multiple deferrals per invoice, with each one posting to different accounts, different time periods or in different amounts. To do this the amount in the Amount to Apportion field should be less than the total deferral amount from the invoice. After you have selected your accounts and adjusted your schedule as needed, click the Save Account button to add the schedule to the list. This will clear all of the fields and you will be able to enter another schedule and save it as well. To make changes to any of the saved schedules, select it in the list and click Edit Existing.
When you have finished creating and editing the deferral schedules click Ok. The deferral entries will be posted when you post the invoice.
Posting the Deferrals (for Retroactive Deferrals)
If you created a deferral on a new invoice, the entries will be posted simultaneously with the invoice. When you add deferrals to an invoice that had already been posted, however, you will need to post the deferral entries separately.
To post them, navigate to the Financial module. In the Transactions pane open the Purchasing Retroactive menu and select either Retroactive Batches or Deferral Posting.
The Retroactive Batches will allow you to preview the transactions before posting them.
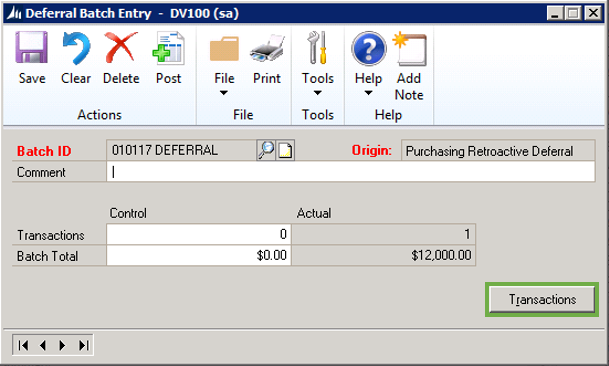
The Deferral Posting will allow you to post multiple batches at once, but you will not be able to edit them.

Once the entries have been posted, you're done. If you ever need to remove a deferral, you can simply delete it. Past and future deferral entries will be reversed. You can also choose whether or not to post the reversals closed periods. No more spreadsheets and no need to make multiple manual entries!