
Deferring revenue & expenses right within Business Central

Imagine a scenario common to many businesses: you receive a bill for a full year of a service—say a yearly bill for your insurance—or you invoice a client for a full year of some service or product you offer. But, you want to recognize that expense or revenue over the course of the year, perhaps evenly and on a monthly basis. This is a common desire for businesses to recognize consistent, monthly incoming revenue or outgoing costs rather than large, sporadic lumpsums.
If you manually track deferred revenue or expenses, you know how timely and tedious it can be to balance these items on various spreadsheets before bringing those entries into your accounting system. Although not difficult, it requires you to manage things outside your system—like an Excel spreadsheet that you have to keep up with and post a recurring entry for each month. Luckily, Business Central has a solution that simplifies this. If you set up a deferral template, you can use it to defer revenue or expense over a set period of time. When you set up this deferral and post it, the monthly lines will be posted and booked automatically with no need for tracking or balancing. You can also check in on the deferrals with reports to ensure the process went through correctly.
Let’s use the example from above to see this process in action. You receive a $12,000 insurance invoice in January for the full year. You want to recognize that expense monthly and expense the same amount each month.
Deferral Setup
First, you need to set up and use a deferral template, which will require you to have the Deferral Code column within the lines of the transaction you are using—in the case of this insurance scenario, the purchase invoice. (The Deferral Code will essentially be the nickname of the template you use.)
If the Deferral Code is not present in that transaction window, you can personalize the lines to add it, and this is a pretty simple process if your Role Center allows for personalization. From the purchase invoice table, clicking the gear in the top left of the main ribbon will open settings, where you’ll then select personalize. From here, select the lines section and add the Deferral Code wherever you wish it to go. Save and now it’s there!

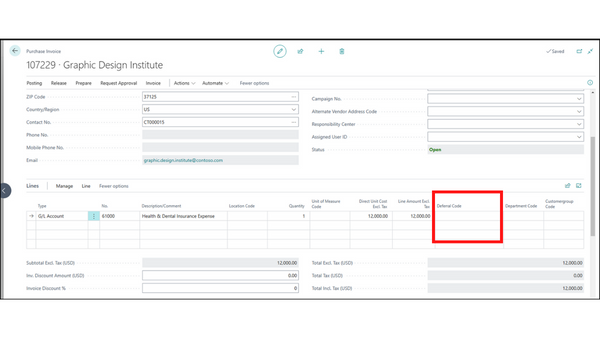
Now, you can fill out the line and select your preferred template. Once the template is selected, you can open the deferral schedule window, but clicking the button with three dots next to the deferral code, to review and update the dates as needed for the deferral. There are a few key fields here that populate based on the data entered on the line and the deferral template you selected:
NUMBER OF PERIODS
Sounds just as simple as it really is: the number of payments you’ll be making to pay off the invoice.
Our scenario: We want to pay monthly for a year, so we’ll enter 12 periods.
AMOUNT TO DEFER
Usually when setting up a deferral, businesses choose the full amount, but you can defer just a portion, if needed.
Our scenario: We’ll choose the full invoice amount of $12,000.
CALCULATION METHOD
You have four options: Equal Per Period, Straight-Line, Days Per Period, and User-Defined.
User-Defined: Instead of using a predefined calculation, the user creating the deferral will enter each period’s amount manually when they set up the deferral schedule or edit the schedule in the transaction.

Equal Per Period: The equation for this method would be Total to be Deferred divided by the NO. of Periods = the cost per period. The cost per period will be equal no matter how many days are in each period.
Our scenario: This would be $1,000/month

Straight-Line: This calculation type is similar to “Equal Per Period” except for the first month. IF you begin payment halfway through a month, for instance, the price will be less the first month – essentially prorated – and that additional cost will be expensed at the end for an additional short month.
Our scenario: If we begin paying on January 15, January’s payment will be about half what a normal month would have been (~$500). The remaining months (Feb–Dec) would be $1,000, and there would be a final month (Jan) that would have the remaining expense amount (~$500).

Days Per Period: The cost per period with this option is dependent on the length of each period. If one period is longer than another, the longer period takes more of the deferral total. This is more consistent to a price-per-day mentality, but less so for that of a monthly price mentality.
If the full month of March (31 days) is one of twelve periods, and we started with 365 days in the deferral period, March’s total would be 11.774% of the total $12,000, or $1019.
Once you finish setting up your deferral, you will be able to review those posts and confirm their success under Sales Deferral Summary page. Each deferred payment will now post in the appropriate period!
CREATE A TEMPLATE
Knowing the above elements of the deferral, you can set up a deferral template (or multiple templates) to easily use in the future. Simply search Deferral Templates and select New in the action ribbon. You can either set up deferral templates ahead of time or create a new one when needed by clicking New under the Deferral Code dropdown menu.

The additional fields on the template card are:
Deferral Code: Make this an easy title you’ll recognize when choosing the template.
Description: Describe the template in more words so it is understood by all users. Perhaps you want to use this template only for one specific purpose: this is the place to identify that.
Deferral Account: You can use you existing prepaid or deferred revenue accounts, or create new accounts for posting to using the deferral codes.
Deferral %: The percentage of the expense or revenue to be deferred.
Period Description: You can add conditional descriptions with regular language to help the posting clarity, and the below are the conditional texts allowed.
%1 = day number of the period posting date out of 364/5 days/year
%2 = week number of the period posting date out of 52 weeks/year
%3 = month number of the period posting date of 12 months/year
%4 = month name of the period posting date
%5 = the accounting period name of the period posting date
%6 = the fiscal year of the period posting date
Because you can mix conditional text with normal text, you can create Period descriptions like this, “Deferred Insurance Payment %4 %6” which would produce post names like “Deferred Insurance Payment February 2023” and “Deferred Insurance Payment March 2023.”
Note: When you're deferring prepaid expenses or revenue, no matter the calculation method, the future accounting periods need to exist. Having these periods in the system proactively doesn't hurt anything, but you want to ensure your users cannot post into these periods—you can specify this in the General Ledger setup—so you don’t have any posting errors caused by these periods being in the system preemptively. The deferral functionality will actually bypass any of these GL controls while still barring normal users from posting routine payments to future periods.
Deferrals will save you time and headspace, plus they are straight-forward to set up within Business Central. Need some assistance setting it up? Get in touch with us→
For more how-to’s, system tips, trainings, webinars, and more, sign up for our monthly newsletter.