
Correct Dimension errors for the most accurate financial reporting

In April 2021, Microsoft made generally available the ability to correct dimensions for general ledger entries. The goal of this shift is to allow your financial reporting to provide you with the most accurate insight possible, and this means not having to account or note data entry errors. Because, let’s face it: mistakes happen! But your financial reporting shouldn’t need to be negatively impacted as a result.
In short, here’s how it works: If you or a colleague have entered a journal entry, posted a document, or added data through APIs and have made an error entering that data, you can go to the General Ledger Entries page and utilize the Correct Dimensions action. You will then be able to edit the dimension values by adding or removing them.
Dimension Corrections Setup
If you’re an administrator, you have options to moderate this function through its setup:
Assign the system permission D365 DIM CORRECTION to the users you want able to make the corrections.
If you have any dimensions you want to block from being changed, you can do so on the “Dimensions Correction Settings page.
You can also disable dimension corrections entirely.
You can limit corrections to respect closed accounting periods.
Finally, you can view a change log for a general ledger entry and revert it back to its original state, if needed.
You’ll also be able to view changes within the History of Dimension Corrections action in the general ledger entry (if a correction has been made).

To open the History of Dimension Corrections, go to “Related” > “Entry” and select “History of Dimension Corrections.”
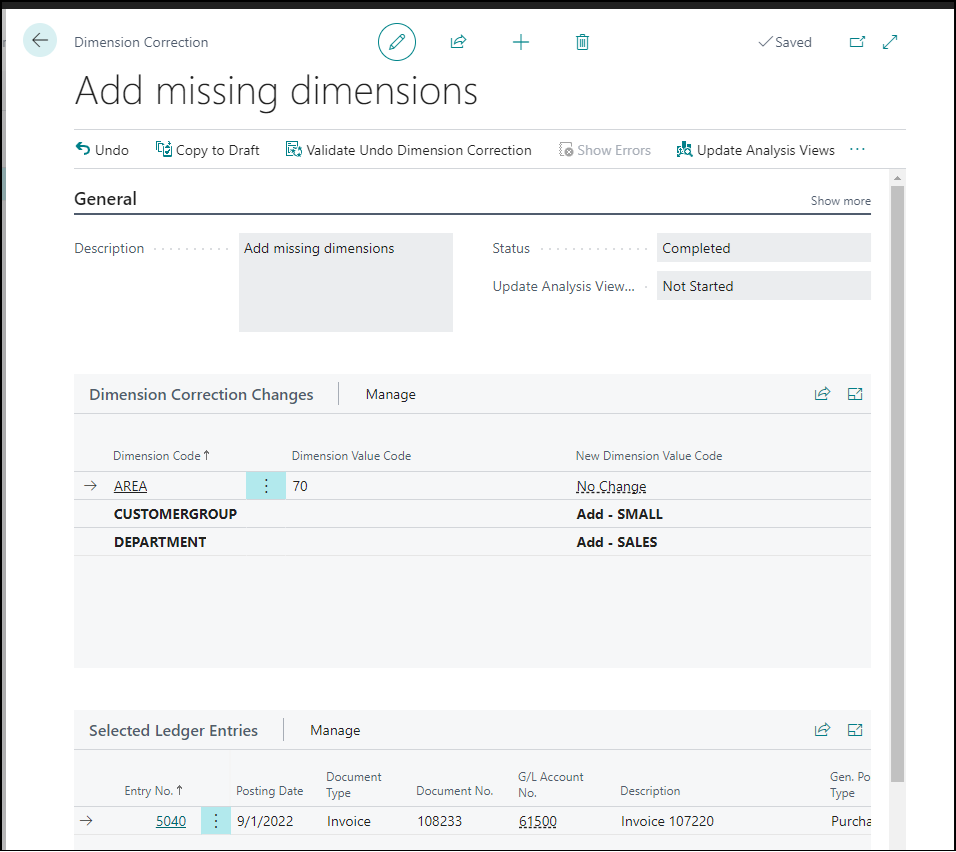
A completed Dimension Correction.
Note that these corrections are only intended for accuracy in financial reporting and will only apply to the general ledger entries. They do not change dimensions assigned to the entries in other ledgers for the same transaction; therefore, there will be a mismatch between the G/L and sub-ledgers when you make these corrections. This function is not meant to eliminate the error itself but to correct and make it inconsequential to financial reporting.
Correcting a Dimension
Now, here’s how we actually go about correcting a dimension. You can do this manually for one or many GL entries, and you can also use filters to identify select sets of entries you need to correct.
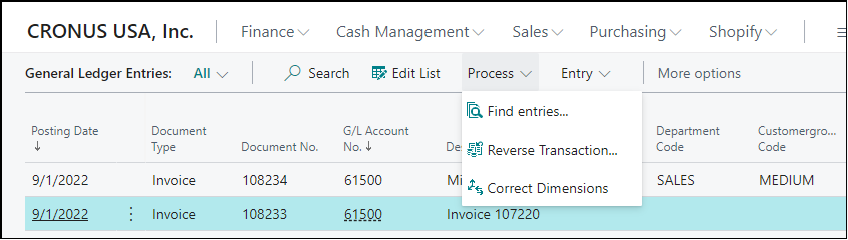
Go to “Process” in the ribbon, then select “Correct Dimensions.”
You can begin a correction from the GL/Register page (select a register and use the Correct Dimensions action in the ribbon) or the General Ledger Entries page (by just selecting the Dimension Correction action). Either way, once the window opens:
In the Description field, describe the change and why it is being made. This is for future reference, especially if time has passed or someone other than yourself is viewing the correction.
In the Selected Ledger Entries FastTab, choose the relevant entries. You always want to select the entries before specifying the dimension change. Here are your options:
Add Related Entries
Add by Filter
Manual Selection
Add by Dimension
Remove Entries
Manage Selection Criteria
Choose the dimension you want to change in the Dimension Code field.
Select the new dimension under New Dimension Value Code.
Validate the correction by hitting Validate Dimension Changes.
Run the correction.
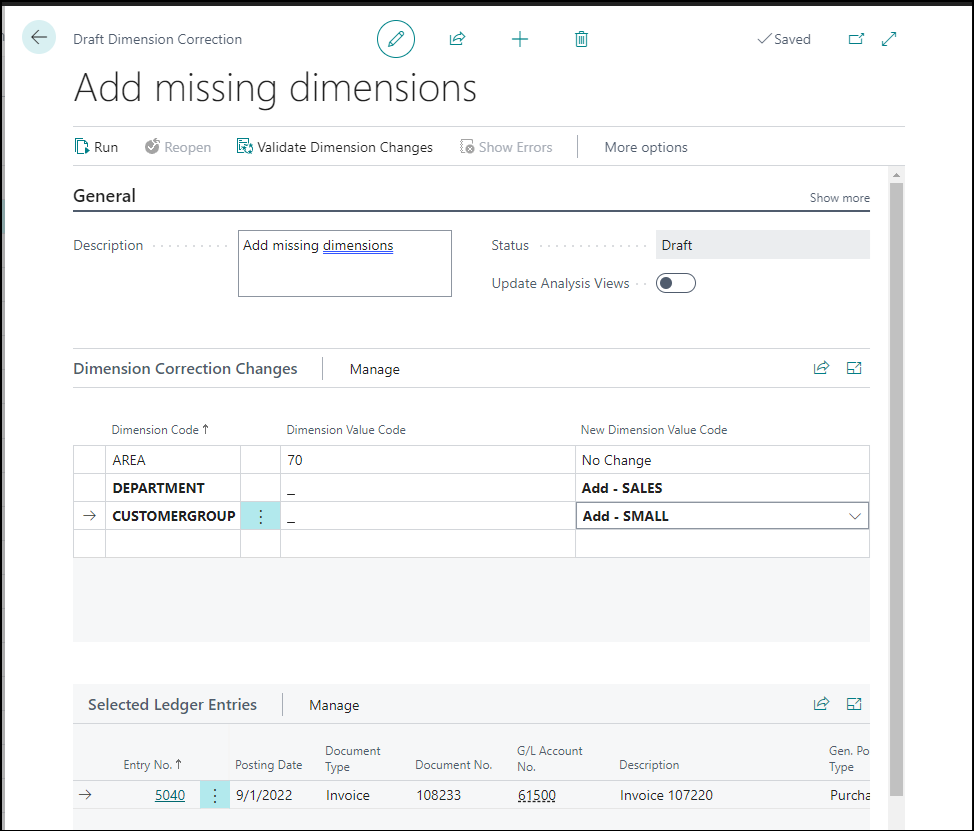
A finished Draft Dimension Correction.
Quick note about points 5 and 6 above: Before running the correction, you will likely want to validate it beforehand, which will check for restricted or blocked dimensions and for restrictions on value posting for the general ledger.
You can Undo the most recent dimension correction you made, but if you find yourself needing to make many corrections or a correction before the most recent, you can Copy to Draft and start a new correction for the same entry.
When setting up a correction, you can run it immediately or schedule the correction for later. We recommend that you run dimension corrections, especially if you are running a large set, outside your normal business hours.

This is Dimension Correction is set to run once, immediately after it is saved. However, you can schedule the correction if you prefer using the “Earliest Start Date/Time” field under “Scheduling Parameters.”
Note that correcting general ledger entries does impact the synchroneity of Cost Accounting, if you are using it. If so, you will manually determine where dimension corrections will impact cost accounting and then likely re-run some or all of your cost accounting models, depending on the situation.
For the latest blogs and updates to Microsoft products rolled up in one convenient package, register for our monthly newsletter!