
Using Item Charges in Business Central
Item Charges in Business Central are a highly useful function that enables the allocation and organization of additional costs necessary for orders. This tool enables you to distribute a bulk cost from a vendor across multiple items. These allocations help ensure that each of your orders is accurately recorded in the Item Unit Cost and Cost of Goods, without omitting important details such as the amount of additional costs paid for service fees, shipping costs, or other non-recurring charges. This function is especially useful to the accounting team, allowing them to capture a more accurate Cost of Goods Sold in their products. In this blog, we will explore setting up and utilizing Item Charges for both purchase orders and invoices, as well as applying these item charges to the item cost. item cost.

Setting up item charges
First things first, you will need to set up your item charges in Business Central. The way you label your item charges may vary depending on your company or specific needs, but the steps will remain the same.
Once you get into Business Central, you will want to use the search bar at the top of the page to look up “Item Charges”.
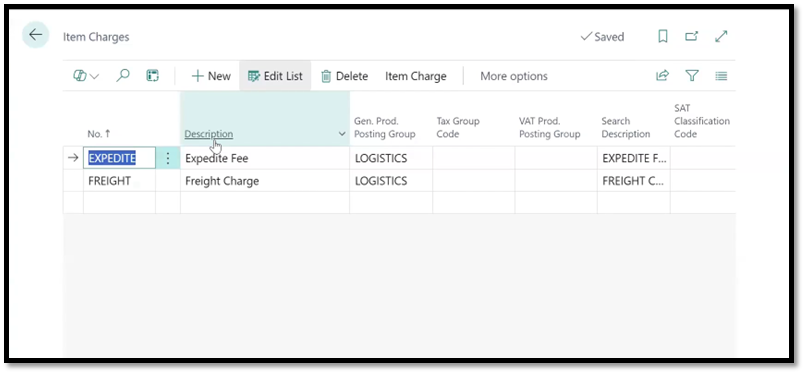
Creating item charges in Business Central
Here, you will enter the item charges necessary for your business. For example, there may be shipping charges, expedited charges, service fees, or other one-off payments. This could vary depending on your company and the types of products you sell.
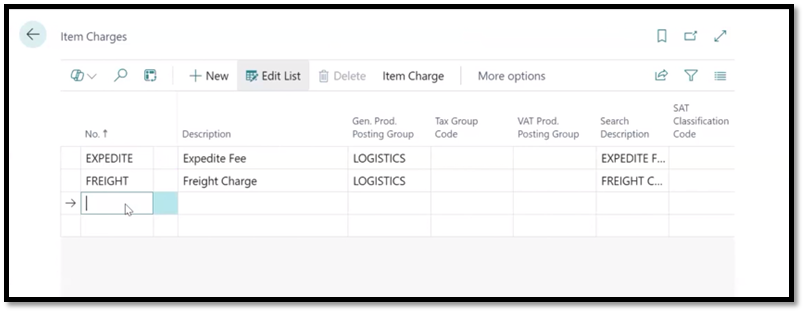
To add a new item:
Click into the empty line below and input your item in the No. section, such as “service fee”.
Add a description, as well as a general product posting group, tax group code, and VAT product posting group (where applicable).
Once you have added all the necessary lines and entered the required information for each line, you have completed the setup and are ready to proceed.
Item charges in Business Central
Using an item charge on a purchase order
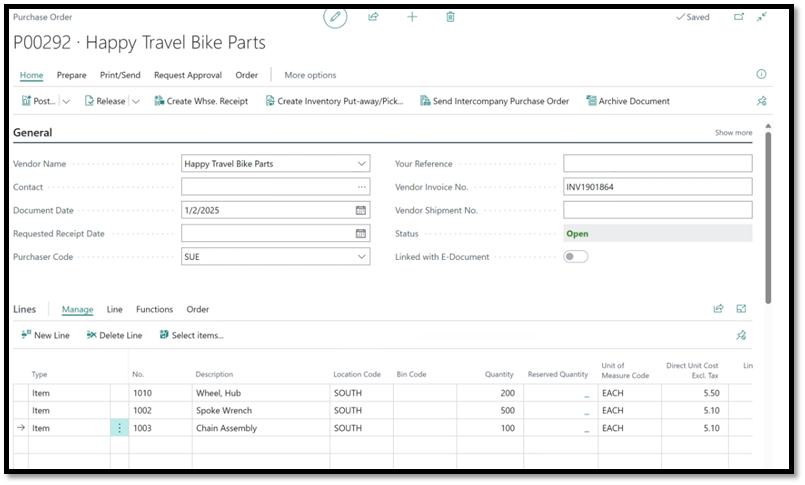
Now that you have completed the setup portion of item charges, let’s dive into how to use them on a purchase order. Imagine a scenario where you order 200 bike parts from a vendor for a total of $1,100, and the vendor charges a $500 shipping fee. Using the item charge features, these fees will not be absorbed and forgotten; instead, they will be distributed across items to reflect a more accurate cost of goods.
Navigate to the “Purchase Orders” page within Business Central and choose the specific purchase order that you would like to add an Item charge to. Still following our example scenario above, once inside the purchase order, scroll down to the line items, and you will find a table containing the line items – in this example, for 200 bike parts, totaling $200.
Adding a charge item to a purchase order
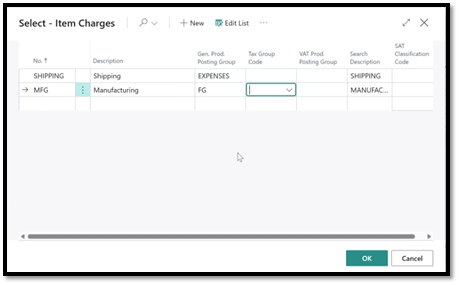
To add the shipping fee that the vendor charged:
Add another line and select “Charge Item.”
Select the specific type of charge in the number field. For this example, we will select “Shipping”.
Enter the quantity, typically 1, and the cost.
Selecting your item charge
Assigning charges to a line
Next, assign the charge to a line. This could look different depending on the number of line items you have, so we will discuss both options.
The first few steps will be the same whether you have 1 line item or multiple.
Highlight the charge item and, at the top of your page, navigate to the “Line” section and select “item charge assignment”. On this page, you will be able to decide how much of the cost you want to assign to each line.
Select “Suggest item charge assignment” at the top of the page.
Business Central will populate the “Quantity to assign” field with 1, meaning that the full shipping charge will be fully allocated to the single PO line.
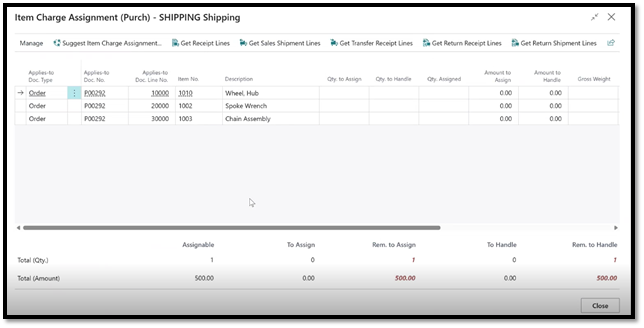
Item charge assignments in Business Central
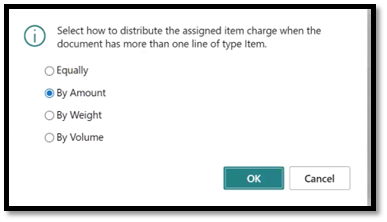
On the other hand, if you have multiple line items, once you select “Suggest item charge assignment,” the process changes slightly. After selecting the “Suggest item charge assignment” option, there will be a pop-up option that asks you how you want to distribute the assigned item charge, equally, by amount, by weight, or by volume.
Equally will allocate the charge equally across all of your line items. If you have 2 lines and a charge of $50, each line will be allocated $25.
By amount is the most common option chosen; it will assign the charge based on the quantity of each line. So if one line has a quantity of 2 and the other line has a quantity of 8, then 20% of the charge will go to line one and 80% to line two.
By weight/volume will allocate the costs based on those amounts, so long as they are populated on the items.
Distributing the assigned item charges
Once you make your selection, Business Central will divide the item cost by each line based on your choice. If you disagree with the way the system has allocated these lines, you also have the option to edit and manually input your preferred allocation.
Receiving and posting the invoice
After allocating the charges is complete, you can now move on to receiving and posting your invoice. This is a crucial step to test and ensure that everything is processed correctly and that no errors occur.
One common error message you may encounter might occur if your item charge is not properly assigned and you attempt to receive the invoice. Be sure to fill out all the required information for your item charge, like description, general product posting group, and any other necessary information, and you’ll be good to go.
To receive and post in the purchase order page, in the home section:
Select “post” then “receive and invoice”.
Go to the “item ledger entries” page in Business Central and find the entry for the order you just submitted.
Highlight the line and select “Entry” and “Value Entries”.
You will then be able to see that the item charge, in this case, the shipping fee, has been accounted for in the total cost of the parts you are ordering. The “cost amount” will display the total cost of parts and shipping fees.

Item ledger entries in Business Central
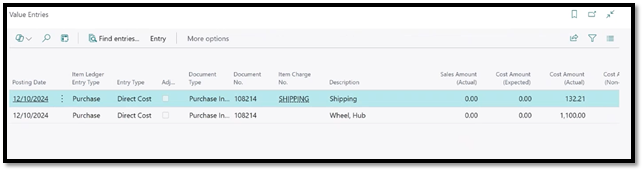
Value entries in Business Central
Using an item charge on purchase invoices
Another way to use item charges is on purchase invoices when the item charge vendor differs from the vendor you purchased from, or when the charge is invoiced separately from the PO. Essentially, this means that if you have a receipt from two separate vendors, you can combine them, or two separate receipts from the same vendor, you can combine them. It is also common for some organizations to apply item charges to the invoice because the charge amount is not known at the time the order is placed. Organizations also choose to use item charges on purchase invoices because they prefer to have their accounting team handle them. The process of using item charges on invoices is similar to the process for purchasing items.
This process will remain the same across both scenarios. For this example, we will focus on the more common scenario of having multiple receipts from the same vendor that you are looking to combine. An example of this scenario is when you order bike parts from a vendor, as we did previously, multiple times in the past few months, and would like to put all of the shipping charges into one receipt. To apply these charges to your cost of goods:
Navigate to “Purchase Invoices.”
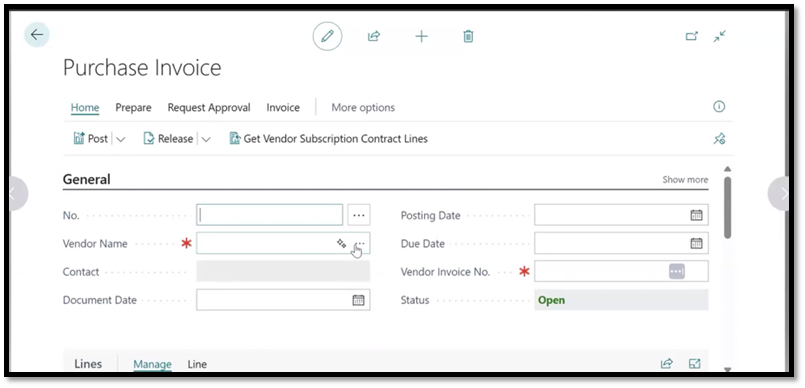
Select “New” to create a new purchase invoice.
Select the vendor that has shipped the bikes.
Scroll down to your lines and replace “item” with “charge (item)”, and in the Item Reference No. field, you can select the applicable charge.
Be sure to fill in all the required fields indicated by the red asterisk. Some fields will be filled in automatically; however, you should double-check to ensure accuracy.
Purchase invoices in Business Central
The next step again is similar to what we have done before with Purchase orders. You will need to inform Business Central which invoices these charges should be added to. On the home page of the purchase invoice:
Go to the “Line” section,” Related information,” then select “Item Charge assignment”.
Select “Get Receipt Lines” and then search for the receipts you are adding this charge to.
Select the receipts and click OK.
The receipts you just selected will then be populated on the Item Charge Assignment page, ready for you to allocate the charges. Select the “Suggest Item Charge Assignment” option and decide again how you would like the charge allocated to each receipt, equally, by amount, by weight, or by volume. From here on, the process will follow the same steps outlined in the Purchase Order section. You can now post this invoice to verify that the numbers and allocations are accurate and meet your approval now that the Item charge has been added to the receipts.
The other scenario you will follow this process for is if you have two different vendors: one you purchase parts from and one you assemble the bikes with, and you have purchase invoices from both. This case scenario is not as common, but it follows the same steps as the previous example, allowing you to combine receipts from two separate vendors.
Overall, Item Charges can be an extremely useful function in Business Central, whether you need to add an extra service or fee to a purchase order, or you have already been invoiced for something and require additional work, or you are looking to add to an existing receipt. This Business Central function will support you in your organization, budgeting, and workflow. If you would like to learn more about Using Item Charges, then sign up for a free Syvantis Learn account, where we have further training on Item Charges and other useful features of Business Central!