A beginner’s guide to Power Automate
Today, there is an ever-constant drive toward efficiency as a means to stay relevant, resilient, and competitive in every industry. This means embracing the forefront of technology and using it to make your job easier, to make what effort you put in pay out more, or faster, or better.
Without a doubt, automation is at the front of the pack, in terms of efficiency-building technology. Automating processes within your business—especially time-consuming, manual, and repetitive tasks—can free up calendars and mindpower for activities that can lend more value to a business.
Enter Power Automate, an application made to connect other apps in order to help them work together to complete your tasks faster, with less effort from you. Power Automate is included these Office 365 subscription plans: Enterprise E3, Business Premium, and Business Essentials (head to our page for pricing and further details). We’ve compiled an overview of Power Automate for those wondering the key questions: what is it, what are its benefits, and how does it work?
What is Power Automate?
Power Automate (formerly Microsoft Flow) is a cloud-based application that builds workflows to automate time-consuming work tasks across applications or web services with little to no codework. Power Automate uses connectors to link applications to each other so they can communicate and complete tasks. At the moment, there are over 500 connectors, and this number is always growing.
Power Automate flows function by establishing a set of actions that begin with a pre-set trigger. This trigger can be automated, instant/manual, or scheduled. If you set an automated trigger, such as receiving an email, the flow will begin as soon as that email arrives in your inbox, without any action on your part. An instant (or manual/button) trigger requires you to essentially press the start button on the flow whenever you want that process to happen, such as sending a reminder or follow up email. Finally, scheduled flows run at preset times/days; for instance, you may set an end-of-day report to run at 5pm Monday-Friday. (Check out our blog outlining key Power Automate vocab!)
Some common uses for Power Automate:
copy or sync files
automate approval workflows
receive notifications
collect data and share it with the team
monitor social media
so much more
Here is just a small number of apps you can connect with Power Automate:
Outlook
MailChimp
SharePoint
OneDrive
Everbrite
Vimeo
Adobe Sign
Azure AD
Salesforce
Excel
Slack
Microsoft Teams
Dynamics 365
Power BI
Google Calendar
…and more
Plus, a developer with more experience, or a Microsoft Partner such as Syvantis, can build custom connectors if there is not currently a connector available for an app that you want to build flows with.
What benefits can Power Automate give my company?
According to a Forrester Total Economic Impact study commissioned by Microsoft, over a 3-year timeframe, Power Automate can provide:
199% ROI
$1.41 million in worker time saving (after applying a 50% productivity capture)
27.4% reduced errors due to increased automation
Without question, Power Automate has the ability to increase efficiency and drive digital transformation.
What these numbers also denote is an enhanced employee and client experience. With the ability to automate repetitive and mundane tasks, an employee will feel more valuable: their time is put to better use, their skills better utilized. Their time, energy, and creativity can be funneled more directly toward actions that engage and interest them while also bringing more value to the organization. Feeling more valuable, using their specialized abilities, contributing to their business’ success in tangible ways, and not spending time on repetitive, mundane tasks: a recipe for more fulfilled employees.
Now consider the customers of said businesses. Not only are processes—like getting approved for a loan—going to go noticeably faster, but employees are likely to be more on top of communication because they have fewer time-intensive tasks on their plate. Plus, their improved satisfaction will inevitably seep into their interactions with customers. All of this can make for happy, loyal customers.
What training do I need to use it?
Wonderfully, Power Automate requires no code to create flows. Any individual can make their own flows without having to learn how to code, removing knowledge and time barriers that may otherwise block a business from using Power Automate. On the flip side, a developer can use any amount of code they wish to build their flows, allowing for deep customization and use of those skills. This truly is a flexible system that can accommodate any level of coding ability.
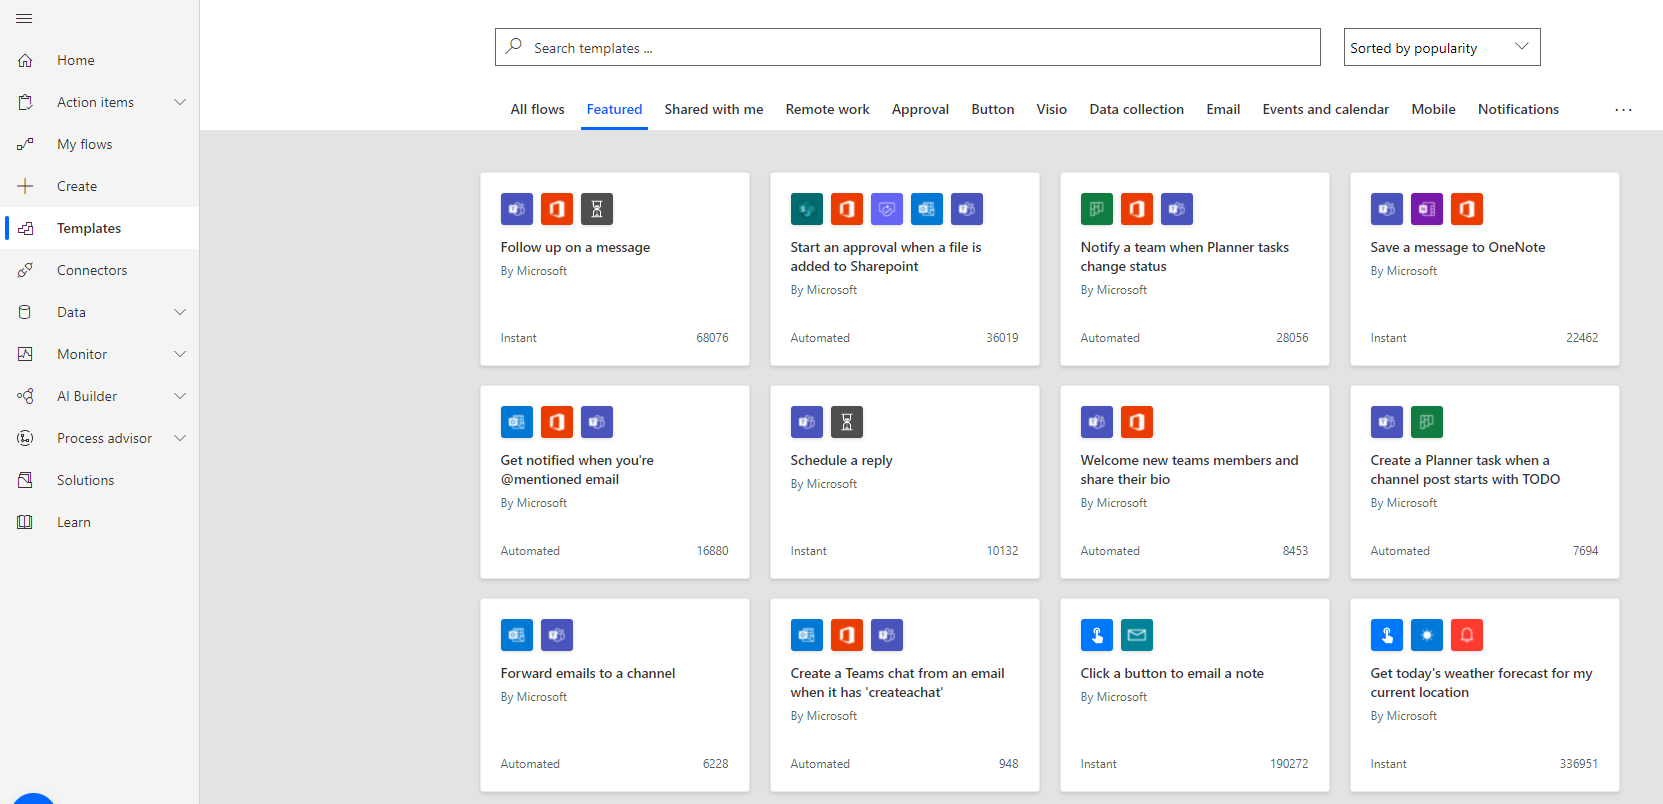
Pre-built flow templates.
How does Power Automate work?
Power Automate uses a highly visual and intuitive drag-and-drop format to create your flows. Connectors act as links between applications, so they can communicate as you define triggers and actions that define what the flow will do.
You can use Power Automate in your browser, via the desktop app, or even on your phone (especially useful for starting instant/manual flows).
To begin a flow, you can start from scratch or choose from the hundreds of pre-built options available in Power Automate. If you choose a pre-built flow, you can use it as-is or edit it to meet your exact needs.
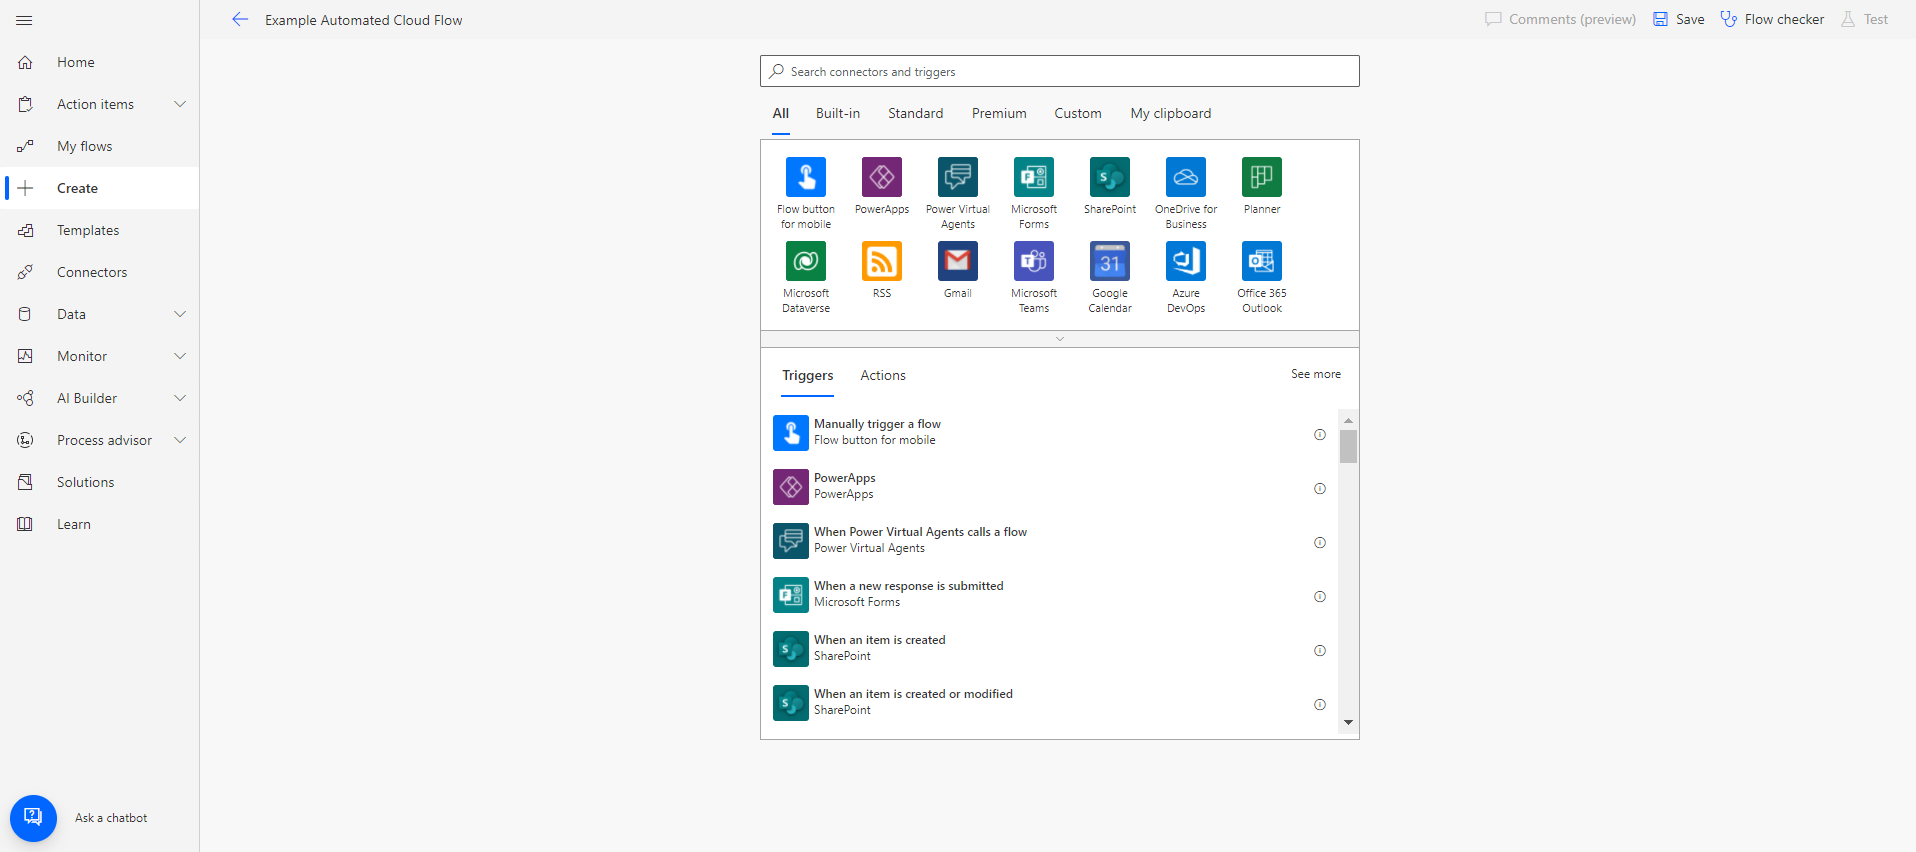
If you start from scratch, you will begin first by defining what type of flow you want to make (automated, instant, or scheduled), then you will pick a connector to start the flow with. The connector should be the app where your trigger occurs – so if your flow starts by receiving an Outlook email, your connector will be Office 365 Outlook.
Creating a flow from scratch.
Let’s continue with the flow example that begins by receiving an Outlook email.
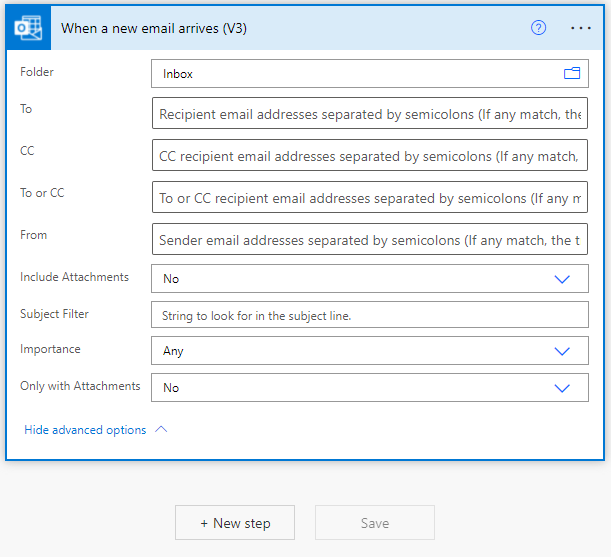
Once your first connector is defined, you will choose your trigger and begin defining details for your flow. You are able to become incredibly granular in triggers and actions. For this trigger alone – receiving an Outlook email – you are able to specify what emails trigger the flow by defining various options, such as words in the subject line, if the email includes an attachment, who sent the email, the importance level, etc.
When you’ve defined what emails trigger the flow, you move on to the next step, which begins in much the same way as the first step. Pick a connector or an action you wish to be the next step of the flow and go on to define the details of that next step. This continues until you finish the steps of your flow, check it for errors, and then publish it for use.
The actions you can choose are vast and depend on the connector you are using, and you also have the ability to set controls – one of the more popular ones being an “If yes/If no” condition. These work much like Customer Journey branching paths, where you define the condition and then determine what happens if that condition is met or not.
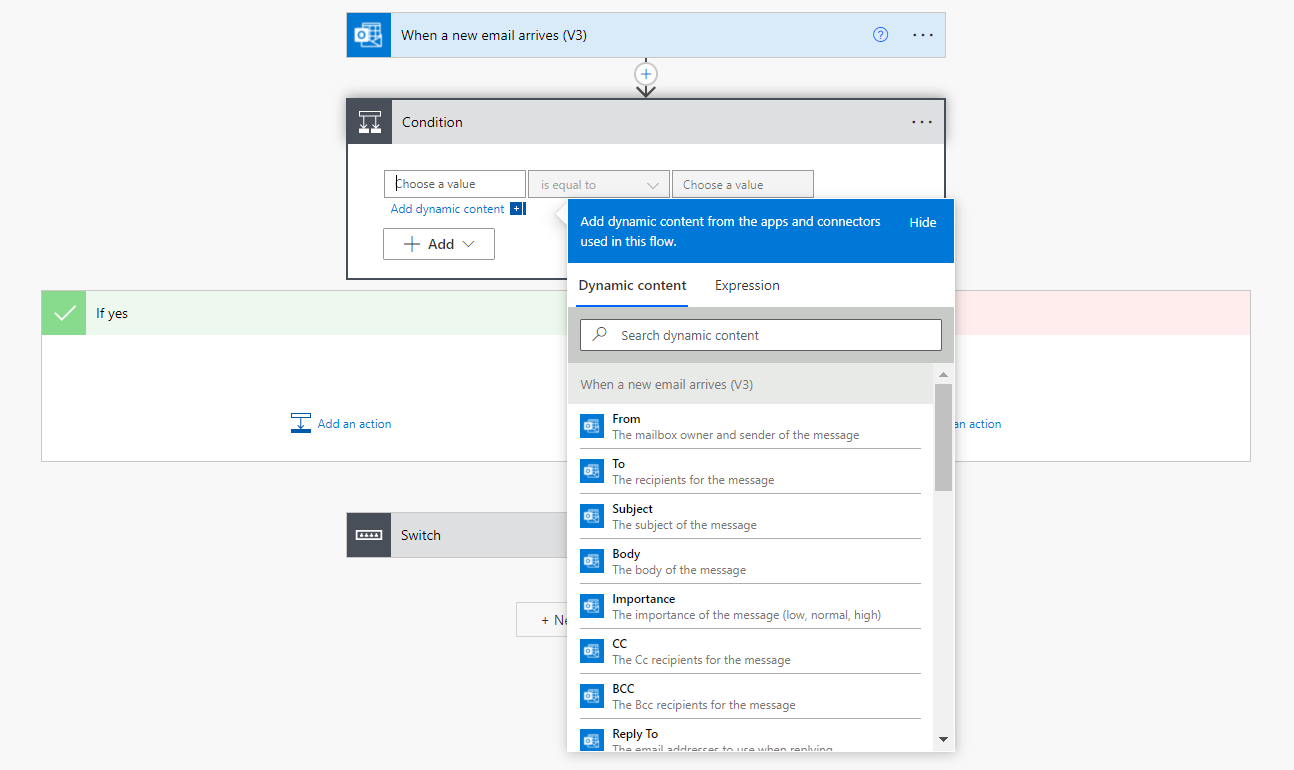
This presents an excellent example of dynamic content within your flows. Power Automate will use the previous steps of your flow to create suggestions for your future content. For instance, in this example, our previous step is an email arrival, so we can set a condition to determine what happens next depending on any condition, like who the sender is, if there is an attachment, the size of the attachment, and much more.
A condition showing dynamic content based on the first step of this flow.
It may feel too straightforward, but that’s really all there is to it. Of course, it does take practice to work with flows comfortably, as with all technology, but the basic premise of a flow is easy to grasp. This is partially due to their highly visual nature, which is meant to aid the maker. Not only do you move through your flow by scrolling up and down, but the flows are also color-coded (green for “yes” and red for “no” in the condition, blue to match the Office 365 Outlook logo, etc…).
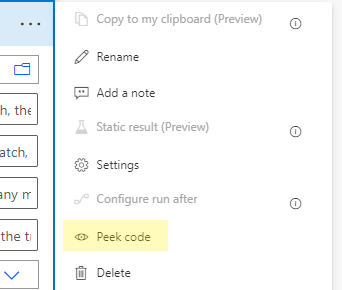
Flows can be as simple or as complex and multi-step as you need. They require no code, but by using the “Peek code” option in any of the action tiles (click the three dots that denote “more options,”) you can see the code and change it. Here you see additional options as well, such as renaming the step and adding a note to the flow.
Finally, as with Spell Check and math formulae, it’s important to always check your work! So regardless your experience with code or Power Automate flows, you’ll always want to use Flow check to identify any errors. The check will tell you exactly what and where the error is so you can find and fix it quickly.
The flow checker identifies one error and specifies exactly what the error is.
Boost efficiency, streamline your processes: Start now
Power Automate is a driver of digital transformation and efficiency that is proven able to provide massive ROI. Set aside your repetitive, time-consuming, manual processes and embrace the ability for apps to connect and work harder for you—with the help of Power Automate flows.
It’s likely you have questions about Power Automate’s ability to help your organization. We’re here to help.


