
How to prepare your 1099s in Business Central
Business Central version 27 includes a new 1099 process that now includes e-file and emailing your 1099s. Below, we walk you through the full 1099 process, from the fields that must be filled out on the vendor form, setting up the IRS reporting period, propagating 1099s, making adjustments, and finally sending the forms to the IRS and vendors. Tune in for this walkthrough of the (new!) once-a-year process so you’re prepared to get your 1099s submitted before the January 31 deadline!

Setting up a vendor for 1099
To ensure a vendor’s 1099 entries are accurately recorded and included in the 1099 reporting process, specific sections on both the vendor card and in the 1099 setup must be properly completed. We’ll begin by outlining these key areas and explaining how to complete each one.
Mandatory setup on the vendor card
First, to enable a vendor’s participation in the automated 1099 process within Business Central, specific information is required to accurately identify the vendor for IRS purposes and facilitate electronic form delivery:
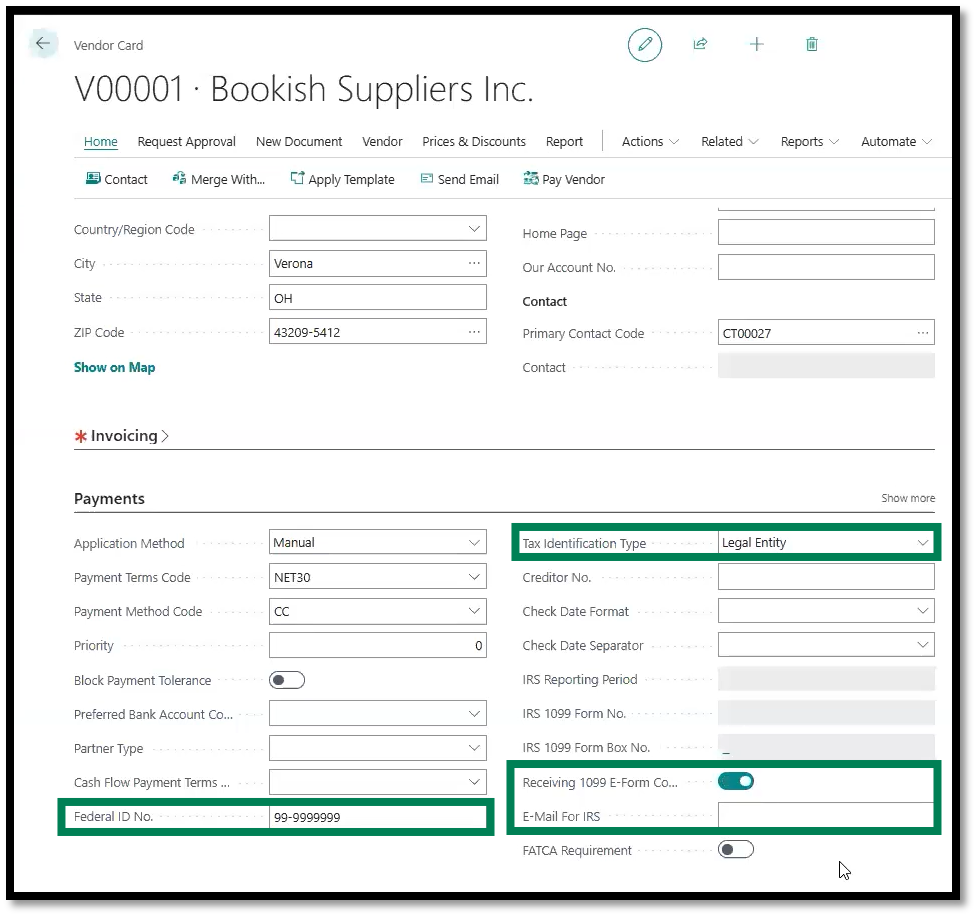
Federal ID Number: Input the vendor’s taxpayer identification number assigned by the IRS If you don’t have one, then inputting the 1099 ID would be acceptable.
Tax Identification Type: Indicate whether the vendor is classified as a Legal Entity or a Natural Person, based on their business structure. A legal entity refers to a business structure, such as an LLC, a partnership, or a corporation. A natural person is someone who is not an employee but a contractor or freelancer. It typically doesn’t matter which of the two it is, as long as you have the option filled in.
1099 E-Form Consent: Select the toggled option confirming that you have received a 1099 consent form, allowing you to send 1099 forms electronically to the vendor.
IRS Email Address: Input the vendor’s email address once you have toggled on the E-Form consent.
These requirements ensure compliance with IRS regulations.
A note here: You want to ensure your vendors are tagged correctly from the beginning of your interactions with them, because they do not retroactively tag or report properly. This is both a benefit and a drawback depending on the situation. While this is inconvenient if you forget to assign a tag initially, it’s helpful for situations where your vendors change codes midway through the year, as Business Central allows a vendor code to be switched at any time. If done properly, this can mean more accurate reporting overall.
Vendor card setup
Setting up the IRS Reporting Periods
You’ll notice upon populating these fields that the IRS fields, including “IRS Reporting Period,” “IRS 1099 Form No,” and “IRS 1099 Form Box No” are all grayed out, which means they cannot be altered here.
You can set this vendor by vendor or for all vendors at once. Let’s walk through both options.
To set this up on an individual vendor:
From the vendor card, go to Related > Purchases > IRS 1099 Setup.
Set the Period Number, which will be the current year.
Select the Form Number
Finally, select the Form Box Number.
After setting up this information, you will see it in the gray fields on the vendor card. Please note that you will need to repeat this process for each vendor.
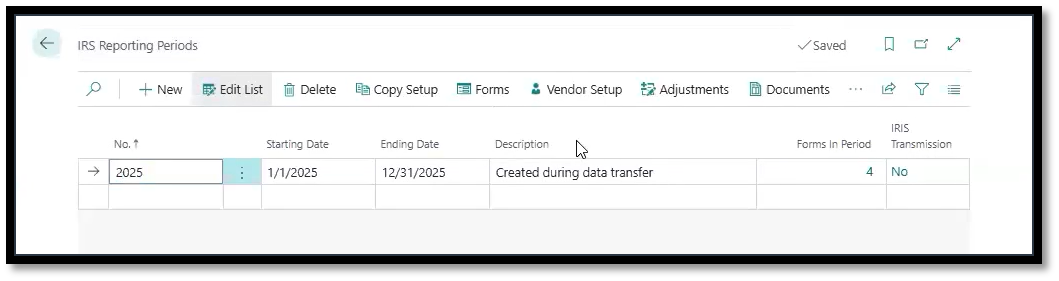
Now, to set up the IRS Reporting Period for all vendors:
Search for “IRS 1099 Reporting Periods” in the main search bar. You’ll see this location under the “Pages & Tasks” section of the results.
On this page, you’ll see the Period (2025 in our example image below), which will funnel through to all the vendors you set up from this location.
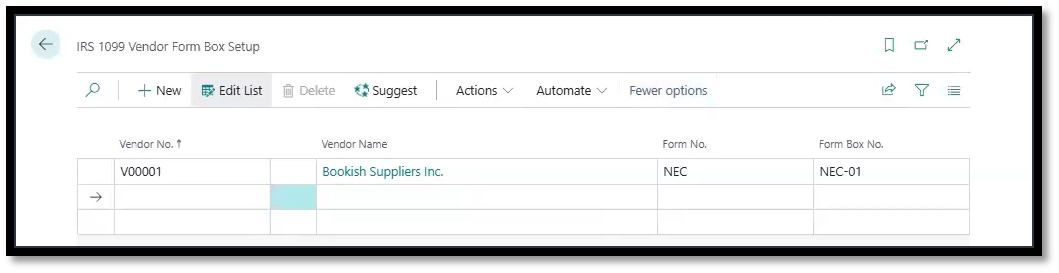
From here, select Vendor Setup in the action ribbon. Here, you can populate all your vendors at once and set the Form Number and Form Box Number.
Alternatively, there is a Suggest action in the ribbon, too, which prompts the system to pull in possible vendors. Be sure to check this list carefully and adjust as necessary if you choose to use this feature.
Setting up the vendors in this single location will save you a lot of time clicking in and out of each vendor card and 1099 setup area within each. To save even more time if you opt out of the Suggest action, it’s also possible to create a configuration package, which your partner should be able to help you do, if needed.
IRS Reporting period set up for vendors
IRS 1099 Form Documents
Once you know your vendors’ 1099 data is set up correctly, you can move forward with getting the 1099 forms themselves created and sent out.
Propagating IRS amounts into open and closed vendor entries
The next step in this process would be to propagate your vendor. Essentially, what that does is pull in all the information you have on a vendor and use it to create a 1099 form. Therefore, each document that you have paid for in the previous year will be used for this purpose; documents from more than 12 months ago or those that have not been paid for will not make it onto the current year’s 1099 form.
Another important note: even invoices dated in the previous year but paid for in the tax year will be included in the 1099.
We have outlined the steps necessary to propagate below:
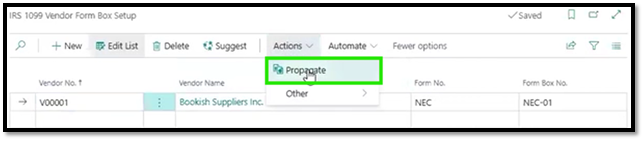
In the “IRS 1099 Vendor Form Box Setup” window, select your vendor.
Click the Actions drop-down menu at the top of the screen and select Propagate.
Toggle on the “Purchase Documents” and “Vendor Ledger Entries.”
Then select Ok.
With this, your 1099 is propagated, and you can move to the next step, which is making any necessary adjustments.
Propagating your vendor
How to insert adjustments
In the Business Central 27 update, adjusting your 1099s is much easier than before. You would need to add an adjustment to your 1099s if there are missing forms or if there was an incorrect input. For example, if there were an $800 payment that was not accounted for to a non-employee (such as a freelancer or contract worker) for compensation, you would need to include that in your adjustments.
To complete these adjustments, navigate to the “IRS 1099 Vendor Form Box Adjustments” section and select the appropriate vendor for whom you need to make the adjustments. You will then make all the same selections as before when setting up the IRS info for the vendor, plus a new field – the adjustment amount. The adjustments will then be automatically saved in Business Central, and you will be ready to proceed with the next steps.
How to create 1099 forms by vendor
Now that your adjustments are complete, you can proceed to create your documents. In the “IRS Reporting Periods” page at the top of your screen, you will see an option that says ‘Documents.” Select it, and you will be brought to the IRS 1099 Form Documents window, where you can then select “Create Forms.” A box with several options will then appear on your screen, including the period, vendor number, and form number. You will fill in all the options available for the form you are creating.
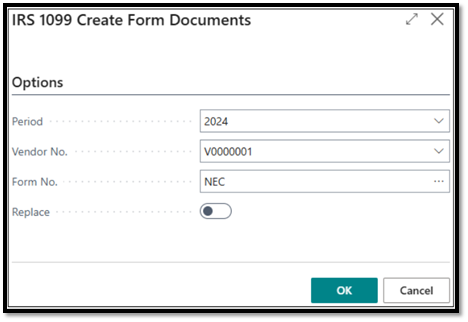
Creating a 1099 form document
In this window, you will notice this “Replace” toggle. Use this when you correct a 1099 form you previously created that includes a mistake, and like the toggle states, the old version of the form will be replaced by the new version.
Once you select 'OK', the system will create the form for the vendor, which includes the vendor ledger entries, calculated amount, and any adjustments you have made. Your 1099 form will be available to view in that 1099 Forms Documents window—just click the Vendor Number to open it up.
Please note that if you have multiple form types, you will need to enter each form individually.
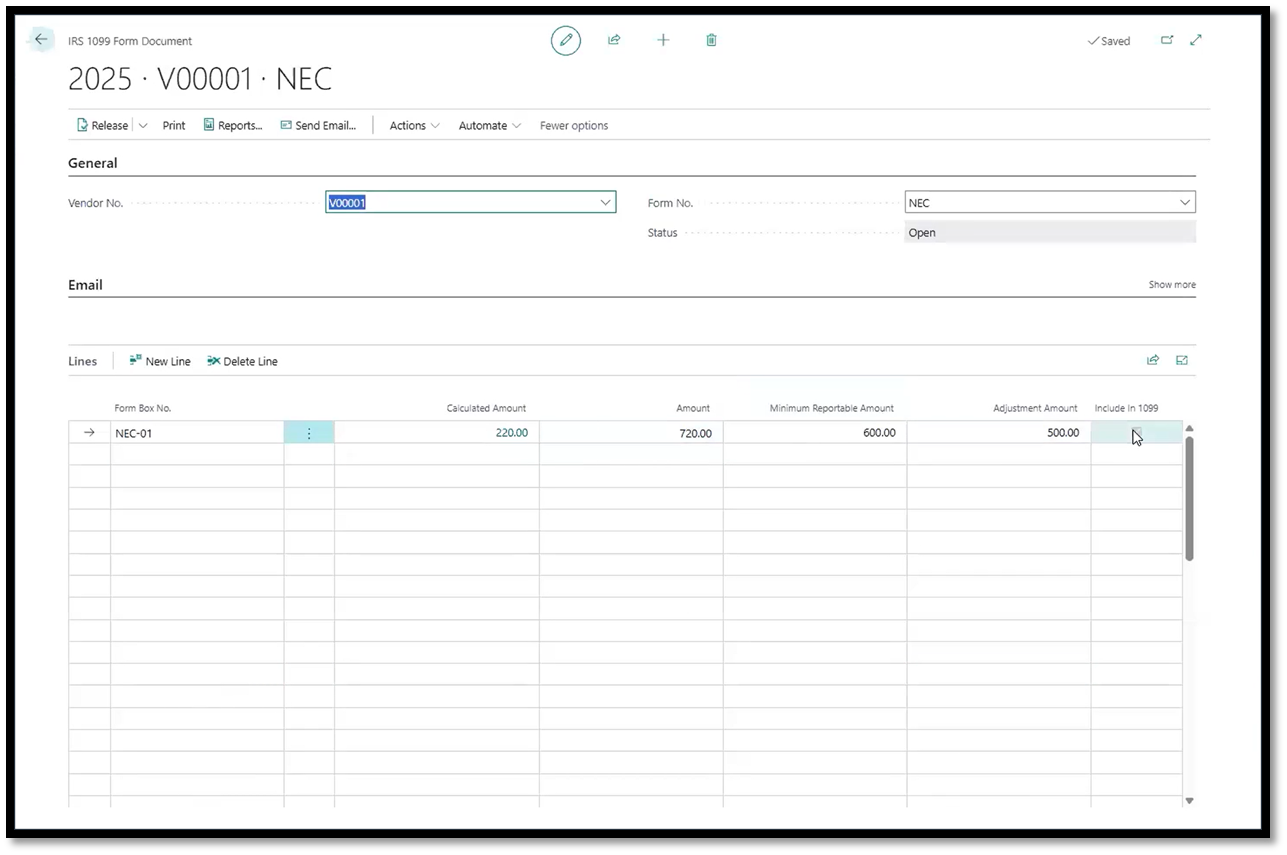
1099 vendor form
Changing status and printing/emailing documents
After confirming that there are no further changes necessary for this form, you will see a “Release” button at the top left of the 1099. Once you release the form, you will be able to print and test the form.
When you’re ready to submit the form, you can go to the “Actions” drop-down menu at the top of the page and select “Mark as submitted,” which will enable you to go forward with printing and emailing.
To do so, select “Print” from the action bar at the top of the 1099 window.
Another settings selection window will open where you can select the Report Type – usually this will be “Copy B” for sending to the vendor. After selecting the Report Type, you can preview the form, print it, or email it. Take a look at it before going on, because the format has changed! Now it can be printed on standard paper, no special forms needed, and it can also be easily emailed.
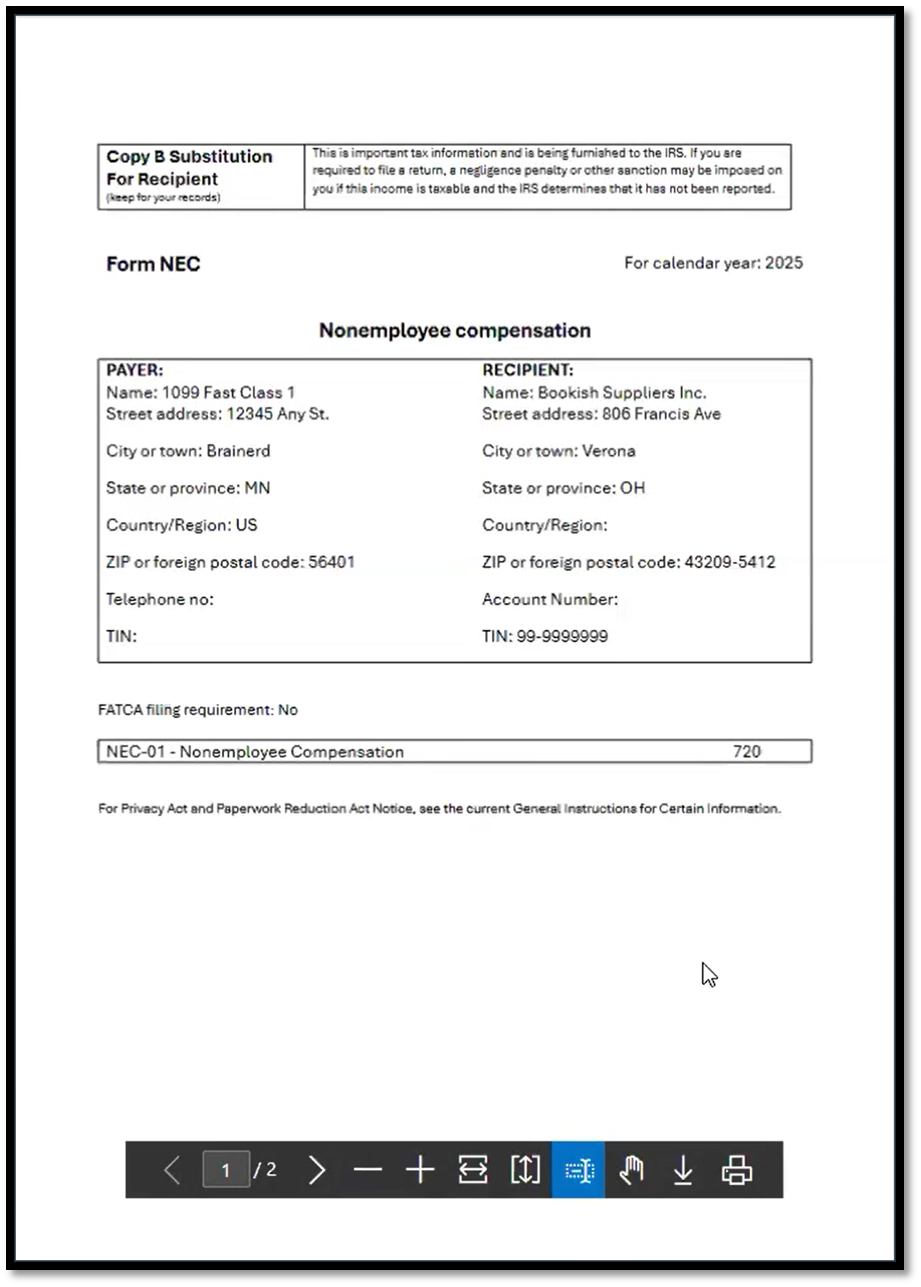
Printing NEC documents
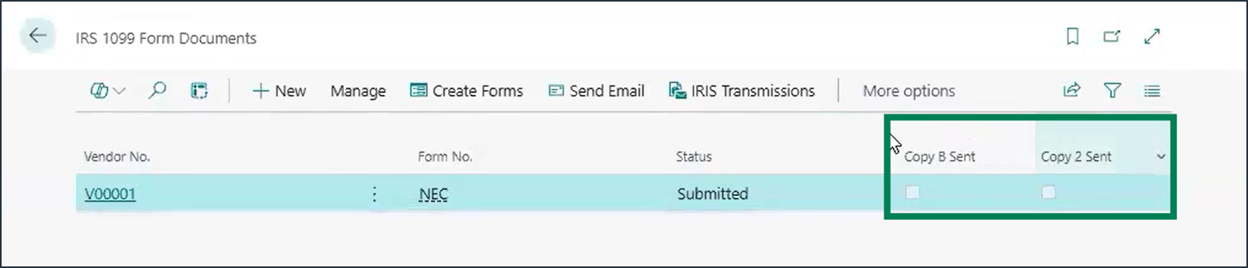
To email out of Business Central, you do need email set up, so be sure that is completed before you need to email 1099s out of Business Central if you choose to do so. And if you do send the form, the “IRS 1099 Form Documents” page includes a checkbox field to specify if the form has been sent.

Emailing and printing IRS documents
Emailing electronically to the IRS
The final step of this process in Business Central is to electronically submit the vendor 1099 to the IRS. You must first get your Transmitter Control Code from the IRS.
Once you have this code, search for Vendor 1099 Magnetic Media. Here you need to enter:
Calendar Year
Transmitter Control Code
Transmitter Information, including the contact name, phone number, and email address (the employer ID is not required)
Vendor Information (This is your Business Central partner’s information! So if you are a Syvantis client, it’s Syvantis’ contact info, including:
Partner name
Address
A contact name, phone number, and email address
There is a toggle directly after the Transmitter Information to “Test File.” If you choose to test the file, this step sends you an email of the file for review before you send it off to the IRS officially.
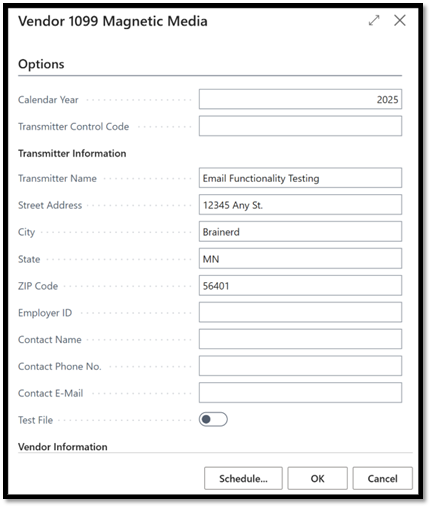
Vendor magnetic media form
In summary, 1099 tax reporting isn’t done very often and has many tedious steps. By following these instructions, you can ensure you are following the correct tax process—which is new this year in Business Central version 27--and make your tax season a little bit easier. Good luck with your tax preparations. If you need additional assistance, please contact your Syvantis representative or Microsoft partner.
We also offer a fast class covering this process. Typically, to access the material, you will need a free Syvantis Learn account; however, for this class, you have the opportunity to watch it on our Syvantis YouTube channel. Be sure to check out this Fast Class, and if you would like to see more of this content, visit Syvantis Learn. With an account, you will have access to many different classes covering various topics from Business Central to CRM and more.